

What Size Dimm Is Used By Desktop Ddr2 Sdrams?
In this sample chapter from, CompTIA A+ 220-901 and 220-902 Cert Guide, Academic Edition, author Mark Edward Soper explains RAM types and features including Retentivity Upgrade Considerations, SO-DIMM vs DIMM, RAM Configurations, Single-Sided vs Double-Sided, RAM Compatibility, and Installing Memory.
This chapter is from the book
RAM is used for programs and data too every bit past the operating system for disk caching (using RAM to hold recently accessed data). Thus, installing more RAM improves transfers between the CPU and both RAM and hard drives. If your computer runs short of RAM, the operating organisation tin also use the hard drive as virtual retention, a boring substitute for RAM. Although the difficult drive can substitute for RAM in a pinch, don't confuse RAM with mass storage devices such equally difficult disks or SSDs. Although the contents of RAM and mass storage can be changed freely, RAM loses its contents every bit shortly as you lot shut down the computer, while magnetic storage can hold data for years. Although RAM'due south contents are temporary, RAM is much faster than magnetic or SSD storage; RAM speed is measured in nanoseconds (billionths of a 2nd), while magnetic and SSD storage is measured in milliseconds (thousandths of a 2nd).
Ever-increasing amounts of RAM are needed as operating systems and applications become more powerful and add more features. Considering RAM is i of the near popular upgrades to add together to any laptop or desktop arrangement during its lifespan, you demand to empathize how RAM works, which types of RAM be, and how to add it to provide the biggest performance heave to the systems you lot maintain.
220-901: Objective ane.iii Compare and contrast various RAM types and their features.
Foundation Topics
Retentivity Upgrade Considerations
When you must specify retentiveness for a given arrangement, at that place are several variables you need to know:
-
Memory module class factor (240-pin DIMM, 184-pin DIMM, 168-pin DIMM, 204-pin And then-DIMM, and so on)—The class factor your system can use has a cracking deal to do with the memory upgrade options you have with whatever given system. Although a few systems can use more than one retention module form factor, in most cases if y'all want to change to a faster type of memory module, such as from 184-pivot DIMM (used by DDR SDRAM) to 240-pin DIMM (such equally DDR2 or DDR3 SDRAM), you demand to upgrade the motherboard get-go.
-
Memory chip type used on the module (SDRAM, DDR SDRAM, so on)—Today, a particular memory module type uses only ane blazon of retentivity. However, older memory module types such as early 168-pin DIMMs were available with different types of memory chips. Yous need to specify the right retentiveness chip blazon in such cases to avoid conflicts with onboard retentivity and provide stable operation.
-
Retentiveness module speed (PC3200, PC2-6400, PC3-12800, and so on)—In that location are three means to specify the speed of a retention module: the bodily speed in ns (nanoseconds) of the chips on the module (60ns), the clock speed of the information bus (PC800 is 800MHz), or the throughput (in Mbps) of the memory (for example, PC3200 is three,200Mbps or 3.2Gbps; PC2-two 6400 is half dozen,400Mbps or 6.4Gbps; and PC3-12800 is 12,800Mbps or 12.8Gbps). The throughput method is used by current memory types.
-
Retention module latency—Latency is how quickly memory tin switch betwixt rows. Modules with the aforementioned speed might take dissimilar latency values. All of the modules in a bank should take the same latency every bit well every bit size and speed.
-
Error checking (parity, non-parity, ECC)—About systems don't perform parity checking (to verify the contents of retentiveness or correct errors), simply some motherboards and systems support these functions. Although parity-checked retention mainly slows down the system, ECC memory tin detect memory errors equally well every bit right them. If a system is performing disquisitional work (such as high-level mathematics or financial functions or departmental or enterprise-level server tasks), ECC back up in the motherboard and ECC retentivity are worthwhile options to specify. Some systems also support buffered (registered) or nonregistered modules. Buffered (more commonly known as registered) modules are more than reliable but are slower because they include a chip that boosts the memory signal.
-
Allowable module sizes and combinations—Some motherboards insist you utilise the same speeds and sometimes the same sizes of retentivity in each memory socket; others are more flexible. To discover out which is truthful about a particular system, bank check the motherboard or system documentation earlier you install memory or add more retentiveness.
-
The number of modules needed per bank of memory—Systems accost retentiveness in banks, and the number of modules per bank varies co-ordinate to the processor and the memory module type installed. If y'all need more than one module per bank, and merely one module is installed, the system will ignore it. Systems that crave multiple modules per bank require that modules be the same size and speed.
-
Whether the organization requires or supports multi-channel memory (2 or more identical retention modules accessed together instead of one at a time)—Dual-aqueduct memory, triple-channel memory, and quad-channel memory are accessed in an interleaved mode to improve memory latency (the fourth dimension required between retention accesses). As a result, systems running dual-channel retention offer faster retentivity operation than systems running unmarried-channel retentivity. Intel introduced triple-channel retention (which runs fifty-fifty faster than dual-channel memory) with its Cadre i7 processor. Quad-channel retention, available on some high-operation Intel desktop and server platforms and AMD server platforms, is fifty-fifty faster. Virtually all of these systems tin can run (admitting with reduced performance) if non-identical retention modules are used.
-
The total number of modules that tin be installed—The number of sockets on the motherboard determines the number of modules that tin can be installed. Very small-footprint systems (such equally those that use microATX or Mini-ITX motherboards) frequently support but one or two modules, but systems that use full-size ATX motherboards oftentimes support three or more modules, peculiarly those designed for multi-aqueduct memory (two or more modules accessed equally a single logical unit of measurement for faster performance).
RAM Types
Near all memory modules use some type of dynamic RAM (DRAM) fries. DRAM requires frequent recharges of memory to retain its contents.
SRAM
Static random-access retentivity (SRAM) is RAM that does not need to be periodically refreshed. Retentiveness refreshing is common to other types of RAM and is basically the act of reading data from a specific area of memory and immediately rewriting that information back to the aforementioned expanse without modifying it. Due to SRAM's architecture, it does non require this refresh. You will notice SRAM being used equally cache memory for CPUs, as buffers within hard drives, and as temporary storage for LCD screens. Normally, SRAM is soldered directly to a printed circuit board (PCB) or integrated directly to a chip. This means that you probably won't be replacing SRAM. SRAM is faster than—and is unremarkably institute in smaller quantities than—its distant cousin DRAM.
SDRAM
Synchronous DRAM (SDRAM) was the kickoff blazon of memory to run in sync with the processor bus (the connectedness between the processor, or CPU, and other components on the motherboard). Almost 168-pin DIMM modules use SDRAM retentivity. To determine whether a DIMM module contains SDRAM memory, bank check its speed markings. SDRAM retention is rated past bus speed (PC66 equals 66MHz bus speed; PC100 equals 100MHz coach speed; and PC133 equals 133MHz bus speed). All SDRAM modules have a 1-scrap prefetch buffer and perform one transfer per clock cycle.
Depending on the specific module and motherboard chipset combination, PC133 modules can sometimes be used on systems that are designed for PC100 modules.
DDR SDRAM
The 2nd generation of systems running synchronous DRAM apply double data rate SDRAM (DDR SDRAM). DDR SDRAM performs two transfers per clock bike (instead of one, as with regular SDRAM) and features a two-scrap prefetch buffer. 184-pivot DIMM retentiveness modules use DDR SDRAM chips.
While DDR SDRAM is sometimes rated inMHz, it is more often rated by throughput (MBps). Common speeds for DDR SDRAM include PC1600 (200MHz/1600Mbps), PC2100 (266MHz/2100Mbps), PC2700 (333MHz/2700Mbps), and PC3200 (400MHz/3200Mbps), but other speeds are available from some vendors.
DDR2 SDRAM
Double data rate 2 SDRAM (DDR2 SDRAM) is the successor to DDR SDRAM. DDR2 SDRAM runs its external data charabanc at twice the speed of DDR SDRAM and features a four-fleck prefetch buffer, enabling faster operation. Still, DDR2 SDRAM memory has greater latency than DDR SDRAM retentiveness. Latency is a measure of how long it takes to receive information from retentiveness; the higher the number, the greater the latency. Typical latency values for mainstream DDR2 memory are CL=5 and CL=6, compared to CL=2.5 and CL=3 for DDR retentiveness. 240-pivot retentivity modules use DDR2 SDRAM.
DDR2 SDRAM retention might be referred to by the constructive memory speed of the memory chips on the module (the memory clock speed x4 or the I/O bus clock speed x2)—for example, DDR2-533 (133MHz retention clock x4 or 266MHz I/O charabanc clock x2)=533MHz)—or past module throughput (DDR2-533 is used in PC2-4200 modules, which take a throughput of more than 4200Mbps). PC2- indicates the module uses DDR2 retention; PC- indicates the module uses DDR retentiveness.
Other common speeds for DDR2 SDRAM modules include PC2-3200 (DDR2-400; 3200Mbps throughput); PC2-5300 (DDR2-667); PC2-6400 (DDR2-800); and PC2-8500 (DDR2-1066).
DDR3 SDRAM
Double data rate three SDRAM (DDR3 SDRAM) Compared to DDR2, DDR3 runs at lower voltages, has twice the internal banks, and well-nigh versions run at faster speeds than DDR2. DDR3 besides has an eight-chip prefetch bus. As with DDR2 versus DDR, DDR3 has greater latency than DDR2. Typical latency values for mainstream DDR3 memory are CL7 or CL9, compared to CL5 or CL6 for DDR2. Although DDR3 modules as well use 240 pins, their layout and keying are unlike than DDR2, and they cannot be interchanged.
DDR3 SDRAM memory might exist referred to by the effective memory speed of the retentivity chips on the module (the memory clock speed x4 or the I/O autobus clock speed x2); for instance, DDR3-1333 (333MHz memory clock x4 or 666MHz I/O bus clock x2)=1333MHz) or past module throughput (DDR3-1333 is used in PC3-10600 modules, which have a throughput of more than x,600MBps or 10.6GBps). PC3- indicates the module uses DDR3 memory.
Other mutual speeds for DDR3 SDRAM modules include PC3-8500 (DDR3-1066; 8500MBps throughput); PC3-12800 (DDR3-1600); and PC3-17000 (DDR3-2133).
Effigy 4-1 compares DDR, DDR2, DDR3, and DD4 retention modules.


Figure 4-i From peak to bottom, DDR, DDR2, DDR3, and DDR4 DIMM desktop memory modules.
-
256MB DDR module, PC3200 (DDR400)
-
CL3 latency
-
2GB DDR2 module (from matched set), DDR2-667 (PC2-5300)
-
CL5 latency
-
2GB DDR3 module, PC3-10600 (DDR3-1333)
-
CL9 latency
-
8GB DDR4 module, DDR4-2133 (PC4-17000)
Parity vs Non-Parity
Two methods have been used to protect the reliability of memory:
-
Parity checking
-
ECC (mistake-correcting code or error-correction code)
Both methods depend upon the presence of an additional memory chip over the chips required for the data passenger vehicle of the module. For instance, a module that uses viii fries for information would use a ninth chip to support parity or ECC. If the module uses xvi chips for data (two banks of viii), information technology would use the 17th and 18th chips for parity (refer to Figure 4-two).
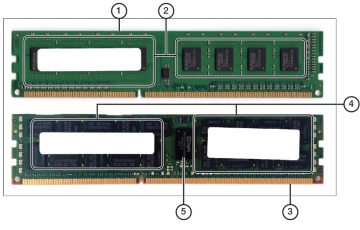
Figure 4-2 A standard unbuffered module (acme) compared to a buffered (registered) module with ECC (bottom).
-
Unbuffered DIMM
-
2 groups of four (total eight)memory chips (no parity bit)
-
Buffered (registered) DIMM with ECC
-
18 memory chips (ii banks of ix, including parity chip)
-
Buffer scrap
Parity checking, which goes back to the original IBM PC, works like this: Whenever retentiveness is accessed, each data bit has a value of 0 or 1. When these values are added to the value in the parity fleck, the resulting checksum should exist an odd number. This is called odd parity. A memory trouble typically causes the data scrap values plus the parity bit value to full an even number. This triggers a parity error, and your system halts with a parity error bulletin. Note that parity checking requires parity-enabled memory and back up in the motherboard. On modules that back up parity checking, there's a parity chip for each grouping of eight $.25.
The method used to fix this type of fault varies with the system. On museum-piece systems that use individual retentiveness chips, you lot must open up the arrangement, push all memory chips back into place, and test the memory thoroughly if you have no spares (using memory-testing software). Or yous must replace the memory if you have spare memory fries. If the figurer uses memory modules, supersede 1 module at a time, test the retentivity (or at least run the computer for a while) to determine whether the problem has gone away. If the problem recurs, replace the original module, bandy out the 2d module, and repeat.
Because parity checking "protects" you from bad memory by shutting down the computer (which can cause you to lose information), vendors created a better mode to use the parity bits to solve memory errors using a method chosen ECC.
ECC vs not-ECC Memory
For critical applications, network servers have long used a special type of memory called error-correcting code (ECC). This memory enables the organisation to correct single-chip errors and notify you of larger errors.
Although most desktops exercise non support ECC, some workstations and most servers do offer ECC support. On systems that offering ECC support, ECC support might be enabled or disabled through the system BIOS or it might be a standard feature. The parity scrap in parity memory is used by the ECC feature to determine when the content of memory is decadent and to fix single-bit errors. Unlike parity checking, which just warns y'all of memory errors, ECC retentivity really corrects errors.
ECC is recommended for maximum data safety, although parity and ECC do provide a small slowdown in operation in return for the extra safety. ECC memory modules utilize the same types of memory chips used by standard modules, but they use more chips and might accept a different internal design to allow ECC performance. ECC modules, like parity-checked modules, take an actress fleck for each group of viii data bits.
To determine whether a system supports parity-checked or ECC memory, check the arrangement BIOS memory configuration (typically on the Advanced or Chipset screens). Systems that support parity or ECC retentiveness can use non-parity checked memory when parity checking and ECC are disabled. Some other proper name for ECC is EDAC (Error Detection and Correction).
Buffered (Registered) vs Unbuffered
Almost types of desktop memory modules employ unbuffered memory. However, many servers and some desktop or workstation computers apply a type of retentivity module chosen registered retentiveness or buffered retention: buffered memory is the term used by the 220-901 exam. Buffered (registered) memory modules contain a register bit that enables the arrangement to remain stable with large amounts of memory installed. The register chip acts as a buffer, which slightly slows downwardly memory access.
Buffered (registered) memory modules can be built with or without ECC support. However, almost buffered memory modules are used by servers and include ECC support. Figure 4-2 compares a standard (unbuffered) memory module with a buffered (registered) retentiveness module that too supports ECC.
And then-DIMM vs DIMM
Most desktop computers use full-sized memory modules known asDIMMs. Even so, laptop computers and some small-footprint mini-ITX motherboards and systems use reduced-size retention modules known equally small outline DIMMs (SO-DIMMs or SODIMMS).
Figure 4-iii compares common DIMM and SODIMM modules.
Table 4-1 lists common DIMM and SODIMM grade factors and their uses.

Figure four-3 DDR2 SODIMM and DIMM modules compared to DDR3 SODIMM and DIMM modules.
-
DDR2 SO-DIMM
-
DDR2 DIMM
-
DDR3 Then-DIMM
-
DDR3 DIMM
Table 4-1 RAM Comparisons
| RAM Blazon | Pins (DIMM) | Pins (SODIMM) | Common Type and Speed | Defining Feature |
| DDR SDRAM | 184 | 200i | PC3200 = 400MHz/3200Mbps | Double the transfers per clock cycle compared to regular SDRAM. |
| DDR2 SDRAM | 240two | 2001 | DDR2-800 (PC2-6400) = 800MHz/6400Mbps | External data bus speed (I/O double-decker clock) is 2x faster than DDR SDRAM. |
| DDR3 SDRAM | 2402 | 204 | DDR3-1333 (PC3-10600) = 1333MHz/x,600Mbps | External data passenger vehicle speed (I/O bus clock) is 2x faster than DDR2 SDRAM (4x faster than DDR SDRAM). |
| DDR4 SDRAM* | 288 | 260 | DDR4-2400 (PC4-19200)= 2400MHz/19200Mbps | External information bus speed (I/O omnibus clock) is 2x faster than DDR3 SDRAM (8x faster than DDR SDRAM). |
| UniDIMM*3 | — | 260 | DDR3 or DDR4 | Designed for use with Intel Skylake (6th generation Core i-series CPU); memory controller on motherboard/ processor must support both DDR3 and DDR4 memory |
Some less-common SODIMM designs include:
-
214-pin MicroDIMM, used for DDR2 SDRAM
-
244-pivot MiniDIMM, used for DDR2 SDRAM
RAM Configurations
Almost all systems can be used with a variety of memory sizes. Still, systems that are designed to access 2 or more identical modules as a single logical unit (multi-channel) provide faster performance than systems that access each module every bit a unit.
Unmarried-Aqueduct
Originally, all systems that used SDRAM were single-channel systems. Each 64-bit DIMM or SODIMM module was addressed individually.
Dual-Channel
Some systems using DDR and about using DDR2 or newer memory technologies support dual-channel operation. When two identical (same size, speed, and latency) modules are installed in the proper sockets, the retentivity controller accesses them in interleaved fashion for faster admission.
Well-nigh systems with two pairs of sockets marked in contrasting colors implement dual-aqueduct functioning in this way: install the matching modules in the same colour sockets (see Effigy 4-four). See the instructions for the system or motherboard for exceptions.
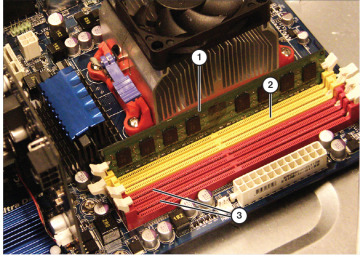
Effigy 4-4 To utilise dual-channel operation on this motherboard, add an identical module to the light-colored retention socket.
-
Installed DIMM
-
Install identical module here for dual-channel operation
-
Use a matched pair (same speed and CL value as the first pair) in these sockets for best operation.
-
This pair need not be the same size as the outset pair.
Triple-Aqueduct
Some systems using Intel's LGA 1366 chipset support triple-aqueduct addressing. Most of these systems use ii sets of three sockets. Populate at least one set with identical retention. Some triple-channel motherboards use 4 sockets, but for best functioning, the last socket should not be used on these systems.
Quad-Aqueduct
Some systems using Intel's LGA 2011 chipset support quad-channel addressing. Most of these systems use 2 sets of iv sockets. Populate 1 or both sets with identical retentivity.
Single-Sided vs Double-Sided
A unmarried-sided (more properly known as unmarried-ranked) module has a unmarried 64-bit broad bank of retentiveness chips. A double-sided (double-ranked) module has ii 64-bit banks of retentiveness stacked for higher capacity. Many, but not all, of these modules apply both sides of the module for memory. Notwithstanding, the use of smaller memory fries enables "double-sided" modules to accept all of the fries on one side. Refer to Figure iv-2. The elevation module is single-sided (one 64-flake rank) and the lesser module is double-sided (two 64-bit ranks), but all of the memory chips are on the front of the module.
Some systems, primarily older systems using DDR2 or older retentiveness technologies, have different maximum amounts of RAM based on whether single-sided or double-sided modules are used. To decide specifics for a detail system or motherboard, check its documentation or use a memory vendor's compatibility list or organization scanner.
RAM Compatibility
When it comes to memory, compatibility is important. The memory module type must fit the motherboard; speed must exist compatible and the module storage size/combination must friction match your estimator system as well.
The labels on the memory modules shown in Figure 4-ane list the manufacturer, module type, size, and speed, and well-nigh as well list the CAS latency (CL) value. If you lot want to buy additional modules of the same size, yous can utilise this data to purchase additional modules.
However, to notice out exactly which type of memory modules are compatible with your motherboard, visit a retentiveness manufacturer's website and check inside its database. Exist certain to accept the model number of the motherboard or the model of the reckoner handy.
Some memory vendors, such equally Crucial.com, as well offering a browser-based utility that checks your arrangement for installed retentivity and lists recommended memory specific to your system. This blazon of utility displays installed memory size and speed.
If you are installing retention in a organization that uses single-sided modules (8 or 9 fries), don't install double-sided modules (16 or 18 chips) equally additional or replacement RAM unless you verify they will work in that system.
Installing Memory
Surprisingly, the CompTIA A+ 220-901 exam lists installing memory in laptops as an objective (220-901 objective 3.1), but information technology does not list installing memory in desktop computers. Withal, this is an of import skill to learn and understand.
Preparations for Installing DIMM Memory
Before working with whatever retentivity modules, plough the computer off and unplug information technology from the Air-conditioning outlet. Be certain to employ electrostatic discharge (ESD) protection in the class of an ESD strap and ESD mat. Use an antistatic bag to hold the memory modules while y'all are non working with them. Earlier really treatment any components, touch an unpainted portion of the example chassis in a further endeavor to footing yourself. Effort not to impact any of the fries, connectors, or circuitry of the memory module; hold them from the sides.
To install a DIMM module, follow these steps:
Step 1. Line up the modules' connectors with the socket. DIMM modules accept connections with different widths, preventing the module from existence inserted backwards.
Step ii. Verify that the locking tabs on the socket are swiveled to the outside (open) position. Some motherboards apply a locking tab on only 1 side of the socket.
Step 3. After verifying that the module is lined up correctly with the socket, push the module straight down into the socket until the swivel locks on each end of the socket snap into place at the top corners of the module (encounter Effigy 4-5). A off-white corporeality of forcefulness is required to appoint the locks. Do non touch the metal-plated connectors on the bottom of the module; this can crusade corrosion or ESD.
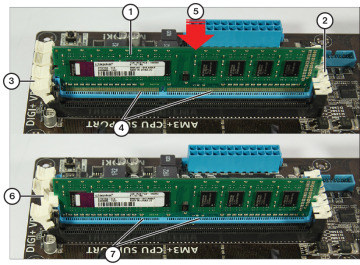
Figure 4-5 A DDR3 DIMM partly inserted (tiptop) and fully inserted (bottom). The memory module must be pressed firmly into identify earlier the locking tab (left) will engage.
-
DDR3 module lined upward for installation
-
Many recent motherboards utilize fixed guides on one side.
-
Motherboards have at least one locking tab per module.
-
Connectors visible when module is not fully inserted.
-
Push button module firmly into identify.
-
Locking tab holds module in place when fully installed.
-
Connectors are no longer visible when module is fully inserted.
For clarity, the retentiveness module installation pictured in Figure four-5 was photographed with the motherboard out of the case. However, the tangle of cables and components around and over the DIMM sockets in Effigy 4-6 provides a much more realistic view of the challenges you face when you install retention in a working system.
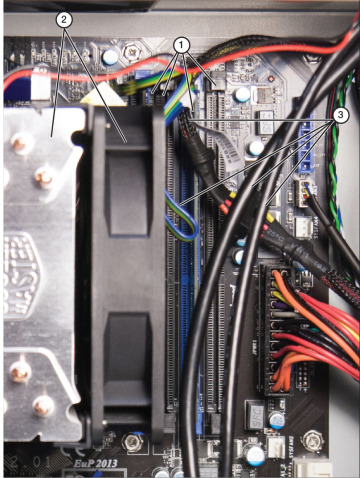
Figure 4-vi DIMM sockets in a typical arrangement are often surrounded and covered up by ability and data cables or aftermarket CPU fans and heat sinks, making it difficult to properly install boosted memory.
-
Memory sockets (some blocked by fan and heat sink)
-
Aftermarket fan and heat sink for CPU
-
Ability and information cables
When y'all install memory on a motherboard within a working organisation, use the following tips to help your upgrade go smoothly and the module to work properly:
-
If the system is a tower system, consider placing the organisation on its side to make the upgrade easier. Doing this also helps to preclude tipping the organisation over by accident when y'all push on the memory to lock it into the socket.
-
Apply a digital camera or smartphone set for shut-up focusing so you tin can certificate the system's interior before you start the upgrade process.
-
Motility the locking tab on the DIMM sockets to the open position before you lot effort to insert the module (refer to Figure 4-5). The sockets shown in Figure four-6 accept closed tabs.
-
If an aftermarket rut sink blocks admission to retention sockets, try to remove its fan by unscrewing it from the radiator fin associates. This is ordinarily easier to practise than removing the heat sink from the CPU.
-
Move power and drive cables away from the memory sockets so you tin can access the sockets. Disconnect cables if necessary.
-
Use a flashlight to shine light into the interior of the system and so you can see the memory sockets and locking tabs clearly; this enables you to determine the proper orientation of the module and to make sure the sockets' locking mechanisms are open.
-
Employ a flashlight to double-check your retentivity installation to make certain the module is completely inserted into the slot and locked into place.
-
Replace any cables you moved or disconnected during the process before you close the instance and restart the system.
<

What Size Dimm Is Used By Desktop Ddr2 Sdrams?,
Source: https://www.pearsonitcertification.com/articles/article.aspx?p=2738309
Posted by: smithweriatere.blogspot.com
0 Response to "What Size Dimm Is Used By Desktop Ddr2 Sdrams?"
Post a Comment