

How To Fix Up An American Girl Doll
Difficulty
Intermediate
| 
For American Girl or 18" Doll, make a storage cabinet or armoire with star cutout. Free plans.
I hope you had Merry Christmas!
I know I've been a little quiet this weekend. We've been spending some much needed family time, just hanging out at home mostly in our jammies, doing things like cooking and eating and playing board game. And of course Grace is playing with her new toys!
Before we get to what Grace is playing with - and I'm super excited about putting her toys in when she's not playing with them - wanted to highlight a few amazing toys made by you!


And Bragged (thank you!) ... here's just a few ...


There's so many amazing projects, I can't post them all - but I hope you take a second to check out all the amazing projects on the Brag Blog! There are many more projects just as darling as these full of ideas and tips and tricks. And to those of you submitting projects, a huge thank you! You are keeping us inspired!
And sweating!
Whew, now it's my turn to post the project I made for Grace. This is hard! All of your projects are so good!

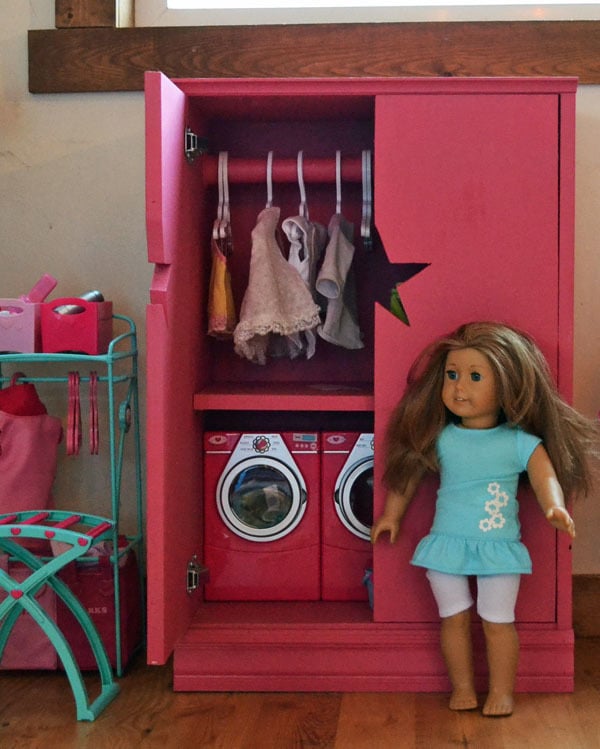
I made this simply doll armoire to store all the accessories Santa was bringing for Grace's American Girl.

Lucky gal ... I've been dreaming of a washer and dryer in my closet for years!

And yes, Grace loves her little doll cabinet.
And Moms are going to love it too. The cabinet holds the doll accessories, and is sized to work as a nightstand. I cut a star out of doors instead of spending more on handles or knobs and spray painted everything pink. The shelf is adjustable, but you can make a fixed shelf.
All accessories you see are purchased from Target. Grace is of course DIY.
Do you have a basket full of doll accessories with no where to go? You can build this cabinet in no time for about $30 in lumber and materials.
Dimensions
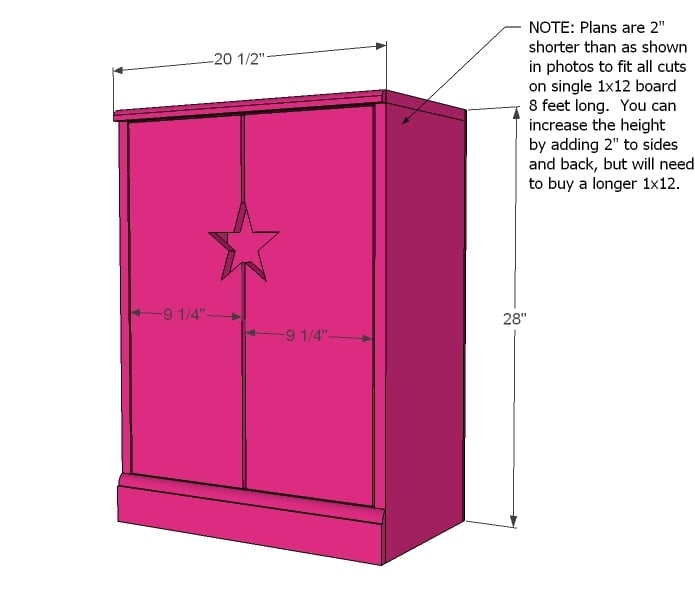
Dimensions are shown above. NOTE: I altered the plan 1 1/4" shorter so all cuts can be made from a single 1x12 8 feet long.
Preparation
Shopping List
1 - 1x12 @ 8 feet long
1 - 1x10 @ 6 feet long
3 1/4" base moulding or 1x3 for footer (20 1/2" long)
Top edge moulding (20 1/2" long)
wood dowel for closet rod
rod pockets
hinges for inset cabinets
You can use either 2" screws or 1 1/4" pocket hole screws
Common Materials
1 1/4 inch finish nails
120 grit sandpaper
paint
paint brush
Cut List
2 - 1x12 @ 28"
1- 1x12 @ 20 1/2"
1 - 1x12 @ 19"
1 - 1x10 @ 19"
1/4" plywood or other backerboard 20 1/2" x 28 3/4"
Moulding @ 20 1/2" OR 1x3 @ 19"
2 - 1x10 @ 24 1/2"
Cutting Instructions
See step 1 before cutting boards.
NOTE: Cut list is adjusted from diagrams to be 3/4" taller than diagrams to maximize board use.
General Instructions
Please read through the entire plan and all comments before beginning this project. It is also advisable to review the Getting Started Section. Take all necessary precautions to build safely and smartly. Work on a clean level surface, free of imperfections or debris. Always use straight boards. Check for square after each step. Always predrill holes before attaching with screws. Use glue with finish nails for a stronger hold. Wipe excess glue off bare wood for stained projects, as dried glue will not take stain. Be safe, have fun, and ask for help if you need it. Good luck!
Instructions
Step 1
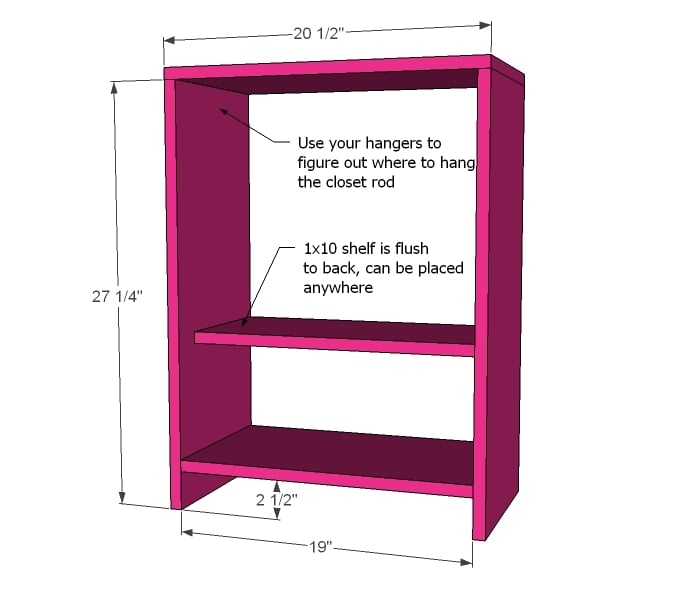
Measure the width of your 1x10 boards. If they are 9 1/4" wide, you are good to go. Otherwise, you will need to adjust the width of this cabinet. Take the width of your 1x10 board and multiply by 2. Add a half inch. This is the width of your shelf. Add another 1 1/2" and this is the width of you top.
Build the box as shown above. Shelf placement is up to you - I made mine adjustable with shelf pins, but you could also screw in place. Use either countersunk 2" screws and glue or pocket hole screws.
Adjust for square.
Step 2
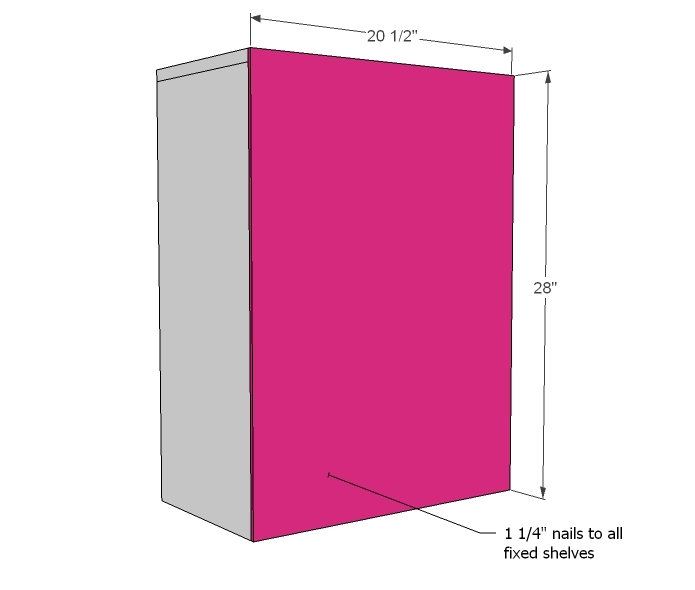
Cut back to fit and attach, ensuring cabinet is square.
Step 3
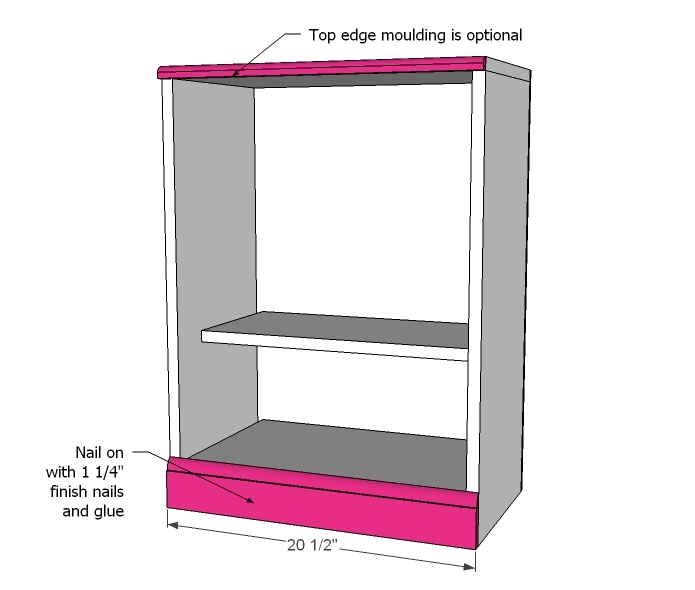
If you choose to use moulding, add to top edge and bottom with 1 1/4" finish nails and wood glue.
Step 4
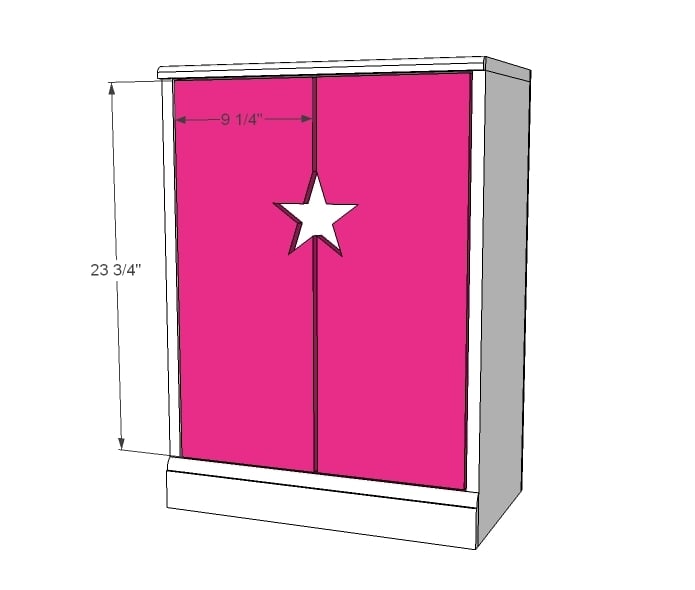
Cut doors 1/4" less than overall height. Install, screwing in place. I used Euro Style Butt Non Mortise hinges for Full Overlay/Inset, but an alternative is to use standard hinges placed on the face of the cabinet.
Clasp or hasp is recommended to keep door shut.
If you are cutting the star from door fronts, see step 6.
Step 5

Step 6
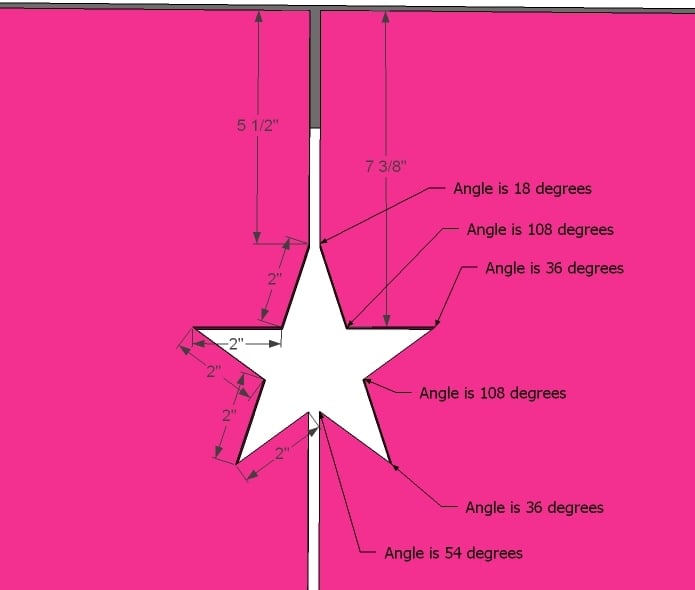
The star was actually really easy to cut and so cute (and cheap!). Just practice first, use a compass to get the angles right, and cut out carefully with a jigsaw making straight cuts. I filed smooth with a file.
Preparation Instructions
Fill all holes with wood filler and let dry. Apply additional coats of wood filler as needed. When wood filler is completely dry, sand the project in the direction of the wood grain with 120 grit sandpaper. Vacuum sanded project to remove sanding residue. Remove all sanding residue on work surfaces as well. Wipe project clean with damp cloth.
It is always recommended to apply a test coat on a hidden area or scrap piece to ensure color evenness and adhesion. Use primer or wood conditioner as needed.
How To Fix Up An American Girl Doll
Source: https://www.ana-white.com/woodworking-projects/star-doll-closet-american-girl-or-18-doll
Posted by: smithweriatere.blogspot.com
0 Response to "How To Fix Up An American Girl Doll"
Post a Comment